Streamlit 선정 이유
데이터분석가/데이터 사이언티스트라면, 내가 모델링한 결과물을 유관부서와 내용을 공유 할 일이 비일비재 할 거다.
나는 매번 [구글 스프레드시트]로 공유했는데, 상품 이미지와 함께 결과물을 봐야 할 때 스프레드시트의 한계에 부딪히게 된다.
그러면 [태블로]로 써야지! 했으나, 태블로에 데이터로 로드하고 결국 시각화하는 작업이 필요하다.
(팀장님의 푸시로.. 버티다버티다)
웹 어플리케이션을 개발하기로 했다.
Python으로 개발 가능한 웹 어플리케이션을 찾아보니 정말 많은 패키지가 있었다.
> Streamlit, Shiny for python, Gradio, Flask, Dash 등등..
이 들 중 Streamlit과 Shiny를 고민했는데.. 각각의 장단점은 이렇다고 한다.
Streamlit
- 설명: Streamlit은 데이터 사이언스와 머신러닝 애플리케이션을 빠르게 만들 수 있게 해주는 프레임워크입니다.
- 특징: 단순한 문법으로 빠른 프로토타이핑 가능, 자동 리로딩 기능.
- 링크: Streamlit 공식 사이트
Streamlit • A faster way to build and share data apps
Streamlit is an open-source Python framework for data scientists and AI/ML engineers to deliver interactive data apps – in only a few lines of code.
streamlit.io
Shiny for python
- 설명: Shiny는 원래 R 언어용으로 개발된 대화형 웹 애플리케이션 프레임워크였으나, Python에서도 사용할 수 있는 버전이 개발되었습니다.
- 특징: 데이터 시각화 및 대화형 UI 요소를 쉽게 추가 가능.
- 링크: Shiny for Python 공식 사이트
Shiny for Python
Build interactive web applications easily with the power of Python’s data and scientific stack.
shiny.posit.co
Shiny 는 원래 R 베이스인데 python 버전이 새로 나온거라, streamlit에 비해 정보가 부족하고 UI가 그리 예쁘진 않았다. 그리고 내게 UI와 Server의 개념이 와닿지 않았다..
Streamlit이 쉽고 빠르고, 커뮤니티가 굉장히 잘 되어 있어 (코드 카피가 쉽다!) streamlit으로 결정!
Streamlit 초기 세팅
1️⃣ 가상 환경에서 Streamlit 설치 (pycharm)
(나는 가상 환경 세팅부터 정말 애먹었다..ㅠ 모르겠다면 GPT에게 묻자)
pip install streamlit
2️⃣ 설치하고 나면 test.py 파일을 생성하고 아래와 같이 입력한다.
import streamlit as st

st.title('lily playground')

######### Layout 만들기 #########
st.header('Make a layout')
3️⃣ 가상환경의 terminal에가서 아래와 같이 입력하면 URL이 뜬다.
streamlit run test.py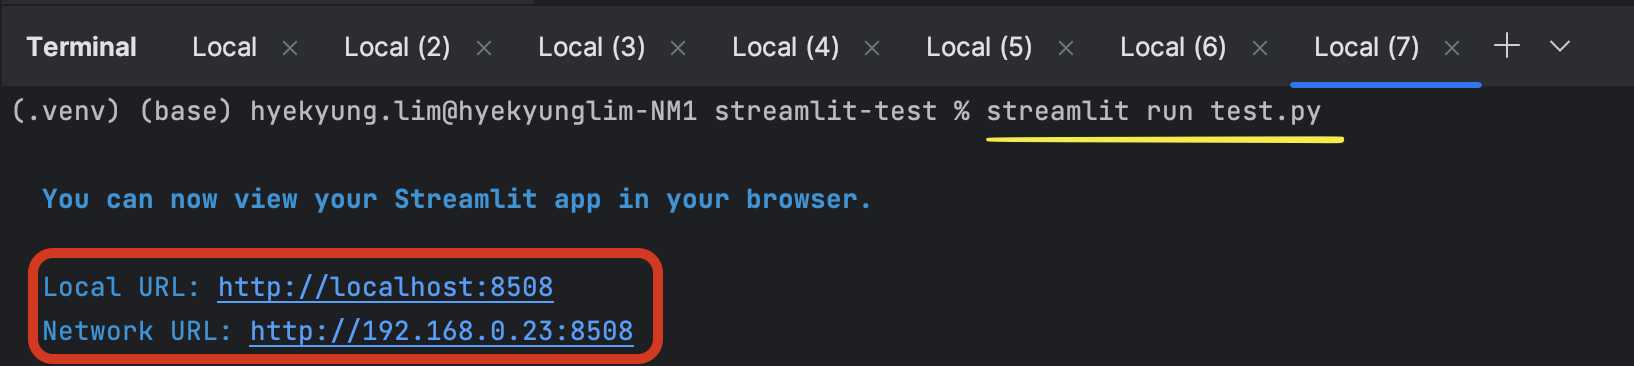
4️⃣ 해당 URL을 누르면 나만의 Web이 실행된다!! (별거 아니네. 훗~)

Streamlit 데이터 연동
자.. 이걸 쓰려면 Data를 가져와야 한다.
나는 구글 스프레드시트와 databricks 을 쓰기 때문에 두 db를 연동할거다.
구글 스프레드시트
https://docs.streamlit.io/develop/tutorials/databases/private-gsheet
Streamlit Docs
Join the community Streamlit is more than just a way to make data apps, it's also a community of creators that share their apps and ideas and help each other make their work better. Please come join us on the community forum. We love to hear your questions
docs.streamlit.io
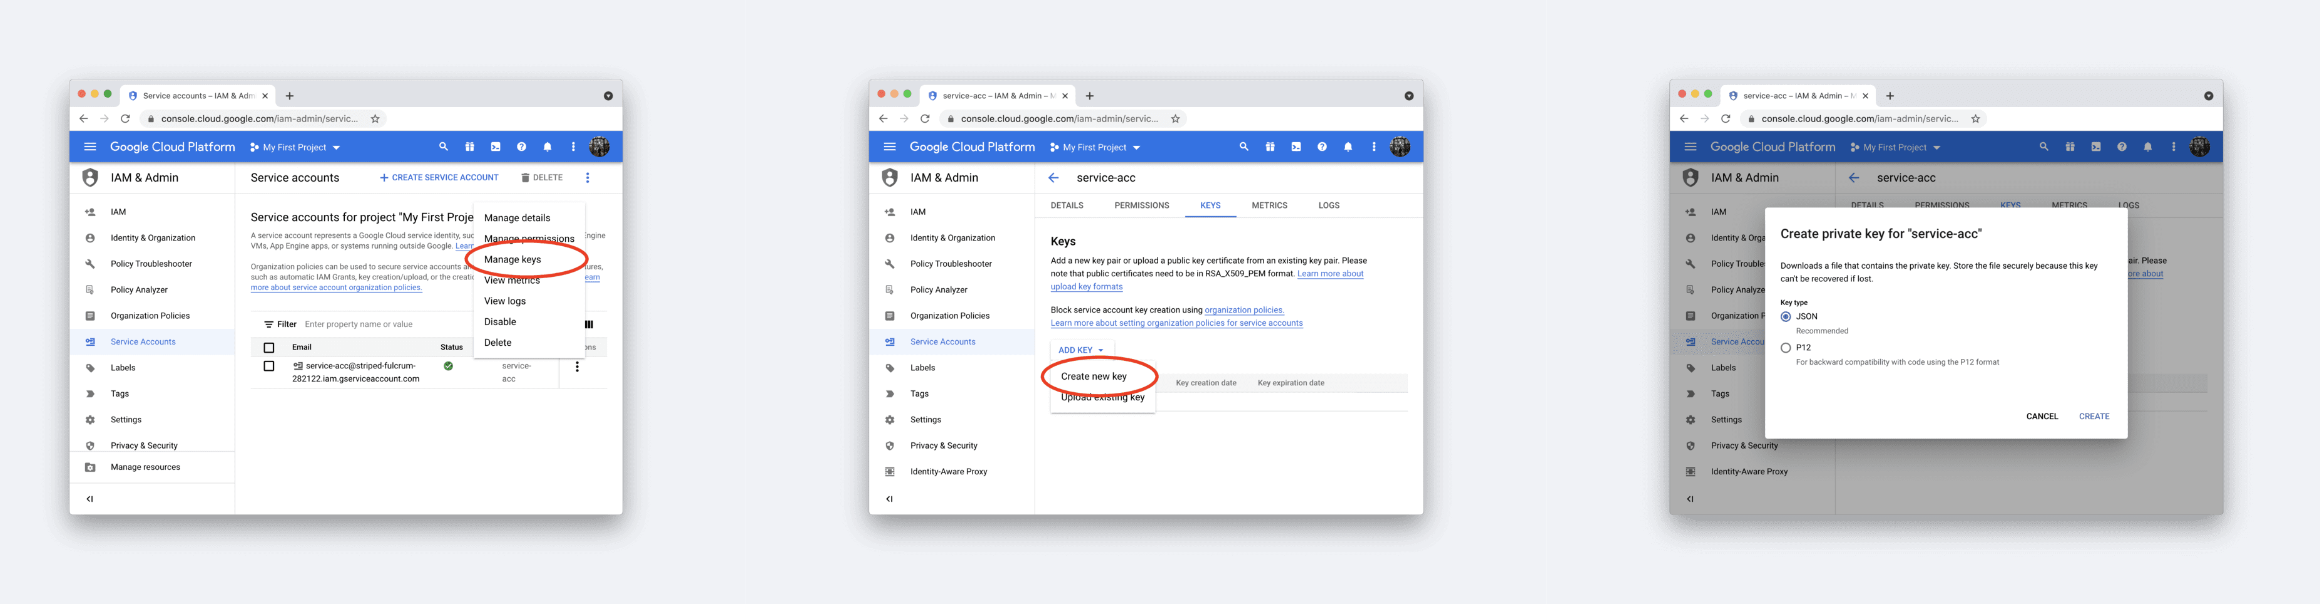
1️⃣ 먼저, 구글 클라우드 service key를 발급받아야한다.
아래 이미지대로 하면, JSON key file을 받게된다. 이 때 받은 JSON key file는 내 가상환경 폴더에 옮겨둔다.
https://console.cloud.google.com/iam-admin/serviceaccounts

JSON key file은 아래와 같이 생겼다. key값들이 있으니 보안주의!
# .streamlit/secrets.toml

[connections.gsheets]
spreadsheet = "https://docs.google.com/spreadsheets/d/xxxxxxx/edit#gid=0"

# From your JSON key file
type = "service_account"
project_id = "xxx"
private_key_id = "xxx"
private_key = "xxx"
client_email = "xxx"
client_id = "xxx"
auth_uri = "https://accounts.google.com/o/oauth2/auth"
token_uri = "https://oauth2.googleapis.com/token"
auth_provider_x509_cert_url = "https://www.googleapis.com/oauth2/v1/certs"
client_x509_cert_url = "xxx"
2️⃣ 연동 할 스프레드시트로 가서 해당 시트를 service account e-mail에게 공유한다. 뷰어 권한이여도 상관없다.

3️⃣ 이제 내 가상환경으로 와서 app.py를 생성하여 구글 스프레드시트를 설치/연동한다.
구글 스프레드시트 패키지 설치
pip install gspread
구글 스프레드시트 연동
import streamlit as st
import gspread
from oauth2client.service_account import ServiceAccountCredentials
import pandas as pd

# Google Sheets API 인증
scope = ['https://www.googleapis.com/auth/drive']

## method1
creds = ServiceAccountCredentials.from_json_keyfile_name('./{JOSN key 파일}', scope)
client = gspread.authorize(creds)

spreadsheet = client.open_by_url("{시트URL}")

# 워크시트 선택
worksheet = spreadsheet.worksheet('{시트명}')

# 데이터를 데이터프레임으로 가져오기
data = worksheet.get_all_records()
df = pd.DataFrame(data)

st.table(df)
실행
streamlit run app.py
Streamlit 데이터 연동 (Databricks sql)
1️⃣ 가상 환경에서 package 설치 (pycharm)
- databricks-sql-connector 설치를 통해 데이터브릭스 클러스터 및 SQL 웨어하우스에 연결이 가능함
pip install databricks-sql-connector
pip install pyodbc sqlalchemy
https://pypi.org/project/databricks-sql-connector/
databricks-sql-connector
Databricks SQL Connector for Python
pypi.org
2️⃣ Authentication secrets 값을 Databricks에서 확인한다.
- Server hostname과 HTTP path key값은 [SQL Warehouses] 에서 확인
- server-hostname is the Databricks instance host name.
- http-path is the HTTP Path either to a Databricks SQL endpoint (e.g. /sql/1.0/endpoints/1234567890abcdef), or to a Databricks Runtime interactive cluster (e.g. /sql/protocolv1/o/1234567890123456/1234-123456-slid123)
- Access token은 쿼리 실행하기 위한 개정으로 [User settings - Developers]에서 Access token을 생성하여 사용
export DATABRICKS_HOST=********.databricks.com
export DATABRICKS_HTTP_PATH=/sql/1.0/endpoints/****************
export DATABRICKS_TOKEN=dapi********************************
3️⃣ Authentication secrets 값을 아래 코드에 입력하고, 별도 파일로 저장한다. (connect_db.py)
import pandas as pd
from databricks import sql

# Databricks 설정
DATABRICKS_SERVER_HOSTNAME = "********.databricks.com"
DATABRICKS_HTTP_PATH = "/sql/1.0/endpoints/****************"
ACCESS_TOKEN = "dapi********************************"

@st.cache_data
def load_data(query):
    # Databricks SQL 연결
    with sql.connect(
        server_hostname=DATABRICKS_SERVER_HOSTNAME,
        http_path=DATABRICKS_HTTP_PATH,
        access_token=ACCESS_TOKEN
    ) as connection:
        with connection.cursor() as cursor:
            cursor.execute(query)
            # 결과를 Pandas DataFrame으로 변환
            data = pd.DataFrame(cursor.fetchall(), columns=[desc[0] for desc in cursor.description])
    return data
4️⃣ Databricks 데이터 가져와 streamlit 생성하기 (app.py)
import streamlit as st
from connect_db import load_data ## databricks sql 가져오기


#### Connect Database
query = ("select * from wev_prod.test.daset11_feed3") ##코드 입력'그녀의 일' 카테고리의 다른 글
| [SQL] 리텐션 구하기 | N-Day Retention, Range Retention, Rolling Retention (0) | 2023.04.25 |
|---|---|
| T-Test 검정 | 일표본T검정, 독립표본T검정, 대응표본T검정 (Python) (0) | 2023.04.07 |
| 기초 통계 용어 정리 | 귀무가설, 대립가설, 유의수준, p-value (0) | 2023.04.07 |
| Swtichback test란? (0) | 2023.03.23 |
| Apach Kafka 란? | producer, consumer, topic, partition 용어 설명 (0) | 2023.03.16 |